In this Google Analytics (GA) Events Example I will be showing how to figure out where people are clicking.
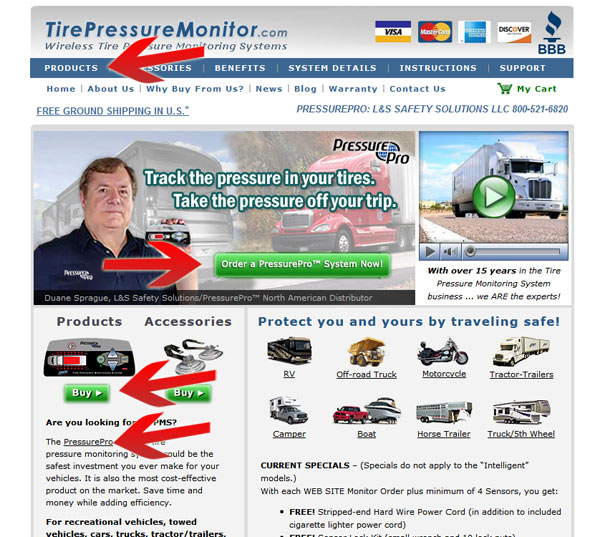
On many sites there are a variety of ways for someone to get from one page to another. In this example we look at a home page example that has 4 links above the fold that go to the same Products page. We wanted to see which one people were clicking on to make sure the page was laid out in the most optimal way.
In this example I’ll be using Tire Pressure Monitor because they have multiple links to the same place.

Above the fold Tire Pressure Monitor has 4 links that go to the same place. In the standard Analytics pages there is no way to know which one of these people are actually clicking on. By adding a short snippet of code to each link we can now see what is actually getting clicked on.
Adding Events
If you are already using GA adding an event is simple and does not require any modification inside of GA.
Here is an example from that website. Note: the mural is a static image and is not a changing slider.
onclick="_gaq.push(['_trackEvent', 'Clicks', 'Products', 'Upper Menu']);"
This code is placed in the individual links like this:
<a href='/products/' onclick="_gaq.push(['_trackEvent', 'Clicks', 'Products',
'Upper Menu']);">Products</a>
This breaks into 4 main parts. I will explain each one in detail.
- _trackEvent: This is just the action that we will be doing and does not need to be modified.
- Clicks: This is the Event Category.
- Products: This is the Event Action.
- Upper Menu: This is the Event Label.
The Clicks, Products, and Upper Menu are all selected by me, and can be anything you want.
Event Category
With GA Events you want to put everything into a category. For this example I’m using Clicks, but we could also use words like ‘Video’, ‘Forms’, etc. This is entirely up to you. It is a good idea to put everything in its simplest category. The Action and Event sections are where you start getting specific.
Event Action
The action in this example is Products. This further allows me to group all of the click events from the home page into the Product category. I can then also create other Click Actions such as ‘Service’, ‘Help’, ‘Video’. So I can see how many times the video on the home page was clicked.
Event Label
In this example the Label is where I will put in the location (Upper Menu) where this event was fired. The 3 other places where I put in this code only have the last place (Upper Menu) changed to:
- Home Mural
- Home Page Dashmount
- Home Page Content
The Event Label is not required for Event tracking. You can have situations where it is not included.
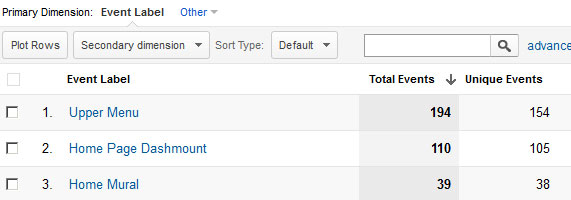
Here is a screenshot of the data being tracked.

Note that this is on the Event Label tab, not the Event Category tab. You have to click a few times to get here. From this we can see that the “Home Page Mural” which takes up the most space is actually the least clicked item that leads to the Products page.
With this data we now know that we should redesign the home page to emphasize the image of the product higher.
Did this help you out? Comment below if it did or you feel it needs further explanation.
